


This post will explain waasmedic. If you are experiencing ‘WaasMedic Agent Exe High Disk Use’ issue in your Windows 10 computer system, then you remain in right location for the service. In this article, you will be managed with simple steps/methods to deal with the mistake. Let’s begins the discussion.
WaasMedic or WaasMedic Agent Exe: WaasMedia or WaasMedic Representative Exe represents the ‘Windows Update Medic Service’. This service is Windows upgrade part and is part of Microsoft Windows Os. This program/service runs in your System’s background for the purpose of repairing Windows upgrade needs to it get harmed or corrupted. In sort, it is real service/process and if your third-party antivirus finds it as malware or danger, then you need to include this service/process to Exception list of your antivirus.
How to Fix WaasMedic Agent Exe High Disk Usage in Windows 10
In this article, you can know about waasmedic here are the details below;
‘ WaasMedic Representative Exe High Disk Usage’ concern: It prevails Windows issue related to high disk use issue. To inspect if this service/process is using high Disk space, you can open ‘Job Supervisor’ and find ‘WaasMedic Agent Exe’ or ‘WaasMedic’ process under ‘Processes’ tab, and check if this service uses high disk. If it shows disk usage in high portion like 50% to 90%, then there could be some issues in your computer system that’s why you facing this.
One possible reason behind high disk use problem can be some bothersome software application or just recently installed third-party software in computer system. It may possible recently installed software or some other software is not trustworthy or it is considered as potentially unwanted application (PUA). In sort, malware or infections attack in your computer can cause this type of error. Also check MAME ROMs.
In such case, you can run custom scan for malware or infections with some powerful antivirus software application in order to eliminate harmful programs/malware in computer system. Likewise, you can attempt to repair the issue by uninstalling the bothersome software application or just recently installed software in computer system. Nevertheless, this concern can likewise be occurred due to some security software installed in computer which is not compatible due to numerous factors. In such case, you can incapacitate and uninstall your anti-viruses software in order to fix the concern. Let’s go for the solution.
How to fix WaasMedic Representative Exe High Disk Use Concern in Windows 10?
Method 1: Fix ‘WaasMedic Agent Exe High Disk Usage’ problem with ‘PC Repair Work Tool’
‘ PC Repair Tool’ is simple & quick method to discover and repair BSOD mistakes, DLL errors, problems with programs, malware or infections problems, system files or windows registry concerns, and other system concerns with just couple of clicks. You can perceive this tool through button/link listed below.
Method 2: Disable or uninstall third-party anti-viruses software
As mentioned, your third-party anti-viruses could be one factor behind this issue. It might possible your third-party anti-viruses software is interrupt WaasMedic Representative Exe (WaasMedic) service in your computer system for some security factors or due to its over security features. Likewise, it might possible your anti-virus is not compatible in your computer system. In such circumstance, you can damage your antivirus software application in order to repair the problem. After disabling your antivirus in Windows computer, check if the error is resolved. If not, you can uninstall your antivirus software application completely in order to resolve the issue. Also check best n64 emulator.
Method 3: Disconnect removable drives (External SSD or HDD, USB flash drive or other).
Sometimes, this issue takes place potentially due to attached/connected removable drives like external HDD or SDDs, USB flash drives or other drives for some reasons. You can attempt to solve the problem by detaching the removable drives attached/connected to computer.
Method 4: Run Drive Clean-up tool.
In some cases, ‘WaasMedic Representative Exe High Disk Usage’ concern is occurred due to insufficient space on your disk drive. You can run Disk/Drive Clean-up tool in Windows 10 computer system in order to clean short-term files, user file history or other unneeded files saved unnecessarily in your computer system to fix the issue.
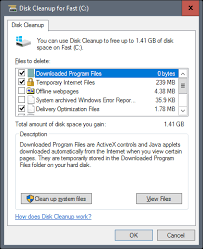

Step 1: Open ‘File Explorer’, discover and right-click on your primary drive ‘C:’, and select ‘Properties’.
Step 2: In ‘Properties’ window, under ‘General’ tab, click ‘Disk Clean-up’ button to open ‘Disk Cleanup’ tool.
Step 3: This will show you a dialog box says, ‘This tool is calculating how much space you will have the ability to free on the drive’.
Step 4: Select submits you want to erase by choosing their checkboxes like short-lived files, thumbnails or other files you want, and then struck ‘Ok’ to perform. As soon as done, please check if the mistake is solved.
Method 5: Pause Windows updates.
One possible method to resolve this problem is to pause Windows updates in ‘Settings’ App in Windows 10 computer.
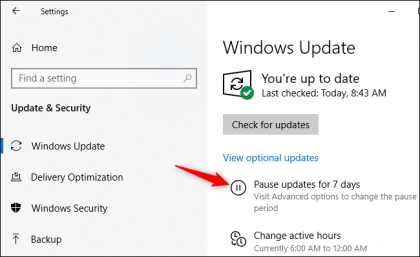

Step 1: Open ‘Settings’ App in Windows 10 and go to ‘Update & Security > Windows Update’.
Step 2: Select ‘Pause updates for 7 days’ option. This way, you can pause your Windows update for 7 days. Once done, inspect if the problem is fixed. If you want to resume Windows upgrade even you applied ‘pause updates for 7 days’ settings, then you require to click ‘Resume updates’ alternative.
Method 6: Repair WaasMedic Agent Exe High Disk Usage problem using Pc registry Editor.
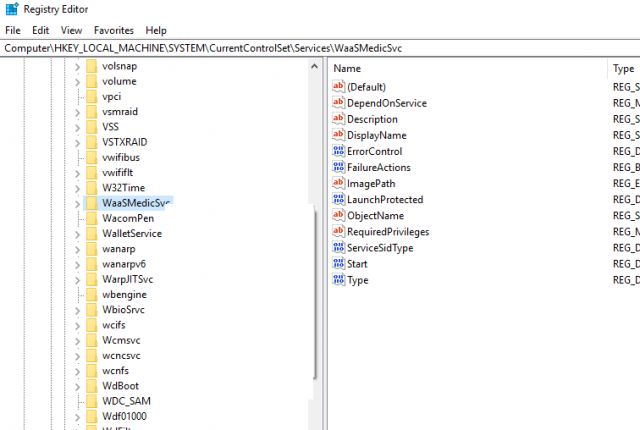

Step 1: Click ‘Windows + R’ keys on keyboard, type ‘regedit’ in the opened ‘Run’ dialog box and hit ‘Ok’ button to open ‘Registry Editor’.
Step 2: Now, navigate to following path.
Computer system \ HKEY_LOCAL_MACHINE \ SYSTEM \ CurrentControlSet \ Services \ WaaSMedicSvc.
Step 3: In ideal pane, discover and double-click on ‘Start’ crucial to edit.
Step 4: Set its worth to ‘4’ and struck ‘OK’ button to conserve the changes. This will disable WaasMedic Agent Exe service in your computer and examine if the error is fixed.
Method 7: Fix WaasMedic Agent Exe High Disk Use issue utilizing Task Scheduler.
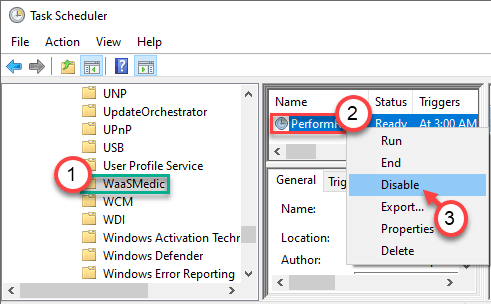

Step 1: Type ‘Job Scheduler’ in ‘Windows Browse Box’ and open it from results appear.
Step 2: Now, in left pane, browse to following course.
Task Scheduler Library -> Microsoft -> Windows -> WaasMedic.
Step 3: In right pane, check if there are any jobs arranged to be executed. Right-click on the task like PerformRemediation and select ‘Disable’ alternative to disable the policy on your computer system.
Step 4: Once done, reboot your computer system and check if the problem is solved.
Method 8: Attempt Windows update blocker to disable ‘WaasMedic Representative Exe’ service.

Step 1: Open your web browser & download ‘Windows Update Blocker’ from ‘Authorities designer website’.
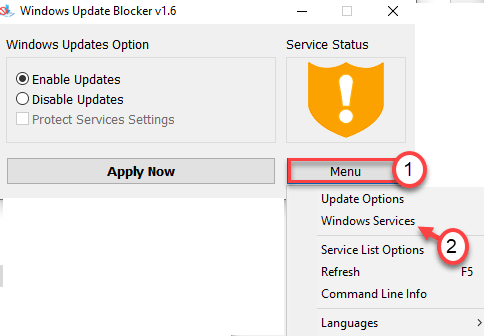
Step 2: As early as downloaded, extract the ZIP file and run ‘Wub_x64. exe’ file.
Step 3: In the opened window, click ‘Menu’ and choose ‘Windows Provider’.
Step 4: Find and double-click on ‘Windows Update Medic Service’ to open its ‘Residence’.
Sep 5: Note down the service name on ‘Note pad’ located under ‘General’ tab.
Step 6: Now, open the paper where you drew out the app to, and right-click on ‘Wub.ini’ file, and choose ‘Open with > Note pad’.
Step 7: Under ‘Dosv= 2,4’, paste the service name you noted down, and ‘add= 3,4’ next to it.
Step 8: Now, open the optimized Windows Update blocker and hit ‘Apply Now’ button to save the changes. As soon as done, please check if the mistake is fixed.
Method 9: Switch On ‘Information Execution Prevention (DEP)’ for WaasMedic.
You can likewise attempt to solve the problem by making it possible for ‘DEP– Data Execution Avoidance’ on the particular application if it is contaminated by malware or virus.

Step 1: Click ‘Windows + R’ keys on keyboard, type ‘sysdm.cpl’ in the opened ‘Run’ dialog box and hit ‘Ok’ button to open ‘System Residence’ window.
Step 2: In the opened window, click ‘Advanced’ tab and click ‘Settings’ button under ‘Performance’ area.
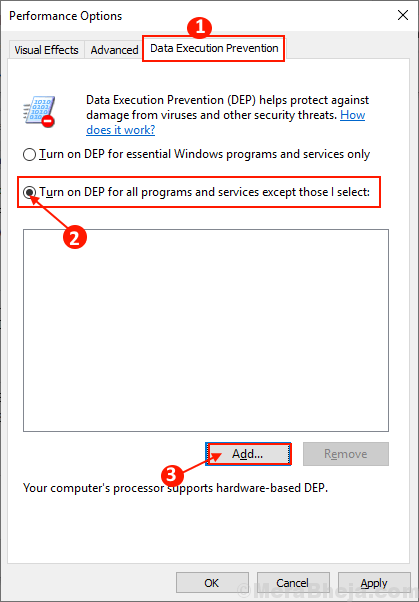
Step 3: In the opened ‘Performance Options’ window, click on ‘Information Execution Prevention’ tab.
Step 4: Check the ‘Turn ON DEP for all programs and services anticipate those I choose:’ checkbox and click on ‘Include …’ button.
Step 5: Now go to ‘C: \ WINDOWS \ system32 \’ course and choose ‘WaasMedic.exe’ from the list of applications and click on ‘Open’ to include it to protection under ‘DEP’.
Step 6: Finally, hit ‘Apply’ and ‘OK’ to save the changes. Once done, please check if the query is fixed. Also check best media player.
Conclusion.
I make sure this post helped you on How to fix WaasMedic Representative Exe High Disk Use concern in Windows 10 with several easy steps/methods. You can check out & follow our guidelines to do so. That’s all. For any ideas or questions, please compose on remark box below.


