


Although most gamers are familiar with Steam, not everyone knows how to get to the steam screenshot folder. Most users have complained about having trouble locating the screenshot they took in the steam screenshot folder.
However, it was not to be found. So I went through Steam’s settings, skimming through the different menu choices for the Steam screenshot folder and all that stuff in the hopes of finding it. I even searched at my monitor to see if it was saved on the hard drive.
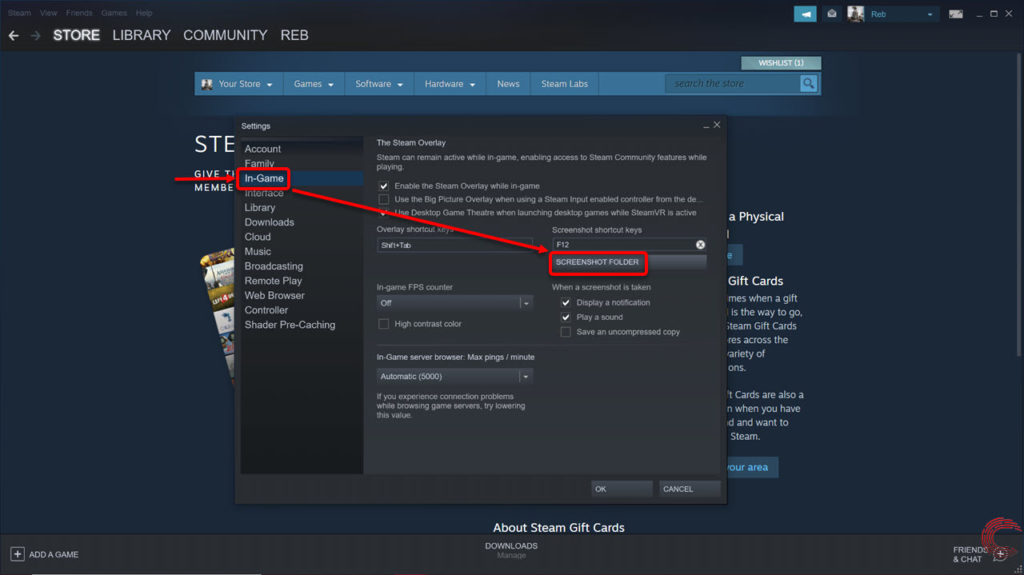
At this point, I decided to throw my hat in the ring and google it to see where my steam screenshot folder was saved. What I discovered was that when you click the F12 button, your screenshots are kept in a secret folder called Screenshots, which is located inside the In-Game directory of your Steam client.
Do you know where are steam screenshots saved? Since Steam doesn’t make it simple to find these steam screenshot folder, a few steps are involved. In this tutorial, I’ll show you how to get to the steam screenshot folder and a few other shortcut tricks you may try.
Why should you take Screenshots of your game?
Are you a gamer who enjoys playing online? Online gamers appreciate the value of taking a screenshot of their game or what’s on their computer. It could be significant in terms of bragging rights. These screenshots, on the other hand, are essential for reporting game bugs and collecting valuable information.

After you’ve taken the screenshots, just as with your computer, you’ll need to handle them, Steam allows you to secure your photos into folders and assign each game to its folder. Steam also helps you save the steam screenshot folder to your hard drive or share them with other gamers in the Steam community. You can also choose to keep the photos private if you prefer.
What Happens to Steam Screenshot Folder?
1.The most straightforward Alternative.
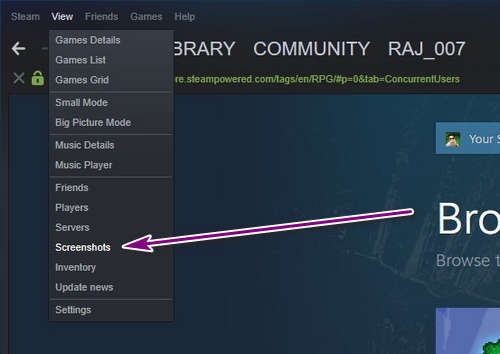
Open your Steam client on your Windows or Mac machine and pick the View tab (on the top menu). Then select the steam screenshot folder from the dropdown menu.
2. Pick the game for which you’ve saved Screenshots.
This will show all of the screenshots you’ve saved for the game you’ve selected. The screenshots can then be viewed directly from your hard drive by pressing the Display on disk (bottom) button.

It’s sorted by game, so you won’t have to dig through your entire library of Steam screenshot folder to find the one you’re looking for. A following approach is an option that allows you to view tour screenshots directly from the hard disk of your Windows PC. If you don’t want to open the Steam Client, this is a great alternative.
3. Easy Access to the Screenshots Folder from a Windows PC
Each Steam consumer has their steam screenshot folder, which contains all of their in-game screenshots. This folder is located on the local disk C, where your Steam app is installed on your PC.
Here’s how to locate it:
- Log in to your computer and then open your File, Explorer.
- Then, in the Search box, type in the following connection to go straight to the screenshots folder. However, there is one missing piece before you enter and check the connection! C:Program FilesSteamuserdata[USER ID] 760remote[GAME ID] 760remote[GAME ID] 760remote[GAME ID] 760remote[GAME ID] 760remote[GAME ID] 760remote[GAME ID] 760re
- Take note of the next portion. Do you note that the relation below has a field labeled USER ID>? Yes, this is your unique Steam ID, which you can find by opening your Steam Client, going to your Steam Profile, and clicking View Profile.
- The Steam ID is the number found at the end of the URL. Copy and paste your Steam ID into the above page, and there you have it! You can now view your screenshots from your File Explorer at any time.
There is no number at the end of the URL that I can see. What is my SteamID, and where will I find it? If you don’t know a number at the end of your Steam profile URL when you view it, open your Steam app, pick View from the top menu, and then Settings.
Now select Interface from the left-hand sidebar. A box that says “Display Steam URL address when open” will appear. To save it, check the box and press OK (below).
You can now go to your Steam Profile and press View Profile (I’ve provided a direct link for you here). A number will indicate your SteamID at the end of the URL.
How do I figure out what my GAME ID (App ID) is?
Navigate to the game in the Store page for which you’re searching for screenshots. After that, you can search the URL in the same way you did with your User ID. The game/application ID is the last number in the URL.
The format for all store URLs is store.steampowered.com/app/APPID.
The URL for Wasteland 2 is http://store.steampowered.com/app/240760/ and the appID is 240760. You have trouble accessing your Steam screenshots? Carry it out.
If you’ve tried everything in this guide and still can’t find the Screenshots, simply click the link below to be taken straight to the Screenshots position in your Steam:
http://steamcommunity.com/my/screenshots/ http://steamcommunity.com/my/screenshots/
The relation above is still up to date.
So, even if Steam’s location changes, the connection above will still point to your Screenshots location. If it doesn’t fit, leave a comment and I’ll fix it.
What about your [app-ID] Steam ID?
To view the steam screenshot folder, you will need to know your Steam ID. If you don’t know your Steam ID, use the steps below to figure it out:
- Launch the Steam client.
- Pick View > from the top menu, then Settings.
- Select Gui from the left-pane menu (of settings).
- Select ‘Display Steam URL address when available’ from the drop-down menu.
- Finally, at the bottom of the window, press Ok.
- Now go to your Steam profile and choose Display Name from the drop-down menu.
- Pay close attention to the number at the end of the URL. Your SteamID is that.
As previously mentioned, once you have your Steam ID, you can use it to access your saved screenshots.
Conclusion
We hope you found this article on how to view and use the Steam screenshot folder in Windows 1o useful. Please return to our website if you need any additional assistance; in addition, you can find better offers on Microsoft Office software, as well as helpful guides and posts.
Would you like to receive exclusive offers, sales, and discounts so you can get the best price on our products? Don’t forget to sign up for our newsletter by filling out the form below! Get the latest technology news sent to your inbox and be the first to read our productivity tips.


